DeinoMPI
The Great and Terrible implementation of MPI-2
DeinoMPI
Deino Software © 2009
Contents
Introduction
DeinoMPI is an implementation of the MPI-2 standard for Microsoft Windows originally derived from the MPICH2 distribution from Argonne National Laboratory.
System requirements:
Windows 2000/XP/Server/Vista/7
.NET Framework 2.0
Features
- UNICODE support. All the functions that take char* arguments now have a second version that takes wchar_t*. DeinoMPI is implemented using wide characters and provides wrapper functions for ASCII char * strings. The name conversion is taken care of automatically with macros in mpi.h so all the user program has to do is define UNICODE and compile. These are the dual implementation functions (The C functions are listed and the C++ equivalents also have wide character versions):
- MPI_Add_error_string
MPI_Close_port
MPI_Comm_accept
MPI_Comm_connect
MPI_Comm_get_name
MPI_Comm_set_name
MPI_Comm_spawn
MPI_Comm_spawn_multiple
MPI_Error_string
MPI_File_delete
MPI_File_get_view
MPI_File_open
MPI_File_set_view
MPI_Get_processor_name
MPI_Info_delete
MPI_Info_get
MPI_Info_get_nthkey
MPI_Info_get_valuelen
MPI_Info_set
MPI_Init
MPI_Init_thread
MPI_Lookup_name
MPI_Open_port
MPI_Pack_external
MPI_Pack_external_size
MPI_Publish_name
MPI_Register_datarep
MPI_Type_get_name
MPI_Type_set_name
MPI_Unpack_external
MPI_Unpublish_name
MPI_Win_get_name
MPI_Win_set_name - Collective operations have been optimized for clusters of SMP machines. The collective operations have been optimized to minimize network traffic when multiple processes reside on each node. The new functions only affect MPI_COMM_WORLD but in the future this support will be extended to derived communicators. For the beta release this functionality has to be turned on by an environment variable. If you want to try it out add "-env DeinoMPI_USE_SMP_OPTIMIZATIONS 1" to your mpiexec command line.
- A secure and robust process manager. The DeinoPM (process manager) uses public and private keys to establish secure connections between machines in the cluster. All traffic between the process managers is encrypted. Each user controls their own keys (similar to the way they would for ssh).
- An abort callback function has been added. This allows for a function to be called asynchronously when a job is about to be aborted. The current implementation uses this function to write out logging buffers to disk before the process is killed. The subsequent log files contain more data as a result.
- Singleton init supports MPI-2 spawn functions. DeinoMPI allows single processes started without the process manager to call the spawn functions just as if it had been started by mpiexec. In other words, if you start your application like this, “mpiexec –n 1 myapp.exe”, or like this, “myapp.exe”, both applications can call MPI_Comm_spawn.
- DeinoMPI has a callback function that can print out the state of the MPI message queues and the recent MPI function call history of a running job. This can be useful for developers when a job hangs and they want to see what MPI messages the processes are waiting on and what MPI function calls they have made.
- DeinoMPI supports directory staging. DeinoMPI can copy a directory and its sub-directories out to the worker nodes before starting a job. Then after the job is finished any modified files in the directories can be copied back to the source. This can be useful to push out executables and data files for a job before it starts.
Installation
Download DeinoMPI.msi and run it on each machine in your cluster. The installation process is identical on all machines and you must be an administrator to install Deino MPI on a machine. In addition to the software libraries and tools a process manager is installed as a Windows service. This action requires administrator privileges. Once the package is installed on the machines all users can use DeinoMPI even if they don’t have administrator privileges.
Note on Windows Vista/7:
Currently on a Windows Vista or Windows 7 machine the installer cannot start the Deino Process Manger service because the installer runs commands with limited privileges even when the user has Administrator privileges. So this means that you have to go to the Services management console after installing DeinoMPI and start the DeinoMPI Process Manager service on each node before Deino MPI jobs can be run (or you can reboot the machines and the service will start automatically). The management console can be started by right-clicking Computer from the Start menu and selecting “manage”. Navigate to the DeinoPM service, right-click and select Start.
User setup
After you install the software on all the machines each user will need to create a Credential store. This store will be used to securely launch jobs. Mpiexec will not run a job without a Credential Store and the GUI tool will prompt the user to create a store the first time it is run. Users can use the DeinoMPIwin tool to create a Credential store or they can use the command line tool, create_credential_store.exe, to create the store.
By default all users have access to all machines where DeinoMPI is installed and can launch jobs on any machines where they have user accounts. If you want to restrict user access to machines you can use the manage_public_keys.exe command line tool. Have an administrator run the following two commands on each machine that you want restricted access to:
1) manage_public_keys.exe /auto_keys false
2) manage_public_keys.exe /clear_all
At this point no users will have access to the machines. Then the administrator can add users one by one using the public key from each user’s Credential store. Have each user export their public key from their Credential store using the GUI tool or the manage_public_keys.exe command line tool. The command line would be something like this:
manage_public_keys.exe /export mypubkey.txt
Then send this file to or point the administrator to this file. The administrator can add access to the user using the following command:
manage_public_keys.exe /import mypubkey.txt
This command is local to a machine and must be executed by a user with administrator privileges on the machine. Since the command is local it must be executed on each machine in the cluster that you want the user to have access to. Once the user’s public key has been imported on one or more machines in the cluster then the user can use mpiexec or the GUI tool to launch jobs on those machines.
Tools
The following tools are installed:
- Mpiexe.exe – The MPI job launcher
- DeinoMPIwin.exe – The GUI interface which includes mpiexec job launching functionality and setup and management tools
- DeinoPM.exe – The process manager service
- Command line tools:
- create_credential_store.exe
- manage_credentials.exe
- manage_public_keys.exe
- Jumpshot – A Java tool to view log files created when MPI jobs are profiled
Security
All communication used during process startup and management is encrypted. The public and private keys in each user’s Credential store are used to establish secure connections between machines in the cluster. The keys are used to encrypt a session key which is then used to encrypt and decrypt session data. The private keys currently are 2048 bit and the session encryption uses the Rijndael (AES) algorithm.
Files
The following sub-directories are created in the location you choose to install DeinoMPI: bin, include, lib, examples and java. The bin directory contains the executable files mpiexec.exe and DeinoPM.exe and Jumpshot.jar and the command line tools. The include directory contains the header files required to compile MPI applications. The lib directory contains the libraries required to link MPI applications. The examples directory contains pre-compiled example applications and source code for each. Read the examples.pdf file for a description of all the examples. The java directory contains the manual for the Jumpshot log viewing application. The dlls used to implement DeinoMPI are installed in the Windows system directory. Two assemblies used are installed in the GAC (Global Assembly Cache), DeinoMPI.dll and DeinoLP.dll.
Compiling Applications
Compile your MPI applications using the following information. Set your include path to include the DeinoMPI\include directory. Set your library path to include the DeinoMPI\lib directory. Link your C applications with mpi.lib from the lib directory. Link C++ applications with the cxx.lib and mpi.lib libraries. Link Fortran applications with DeinoFMPI.lib.
There are several versions of the Fortran link libraries to support common name mangling and calling conventions used by various Fortran compilers. The following libraries contain the specified formats:
· DeinoFMPI.lib – MPI_INIT and mpi_init_. All capital external names and all lower case external names with a trailing underscore. Functions use the C calling convention. There is a Unicode version of this library also – DeinoFMPIu.lib. The Intel compiler uses this format as of the 8.x series. The Portland Group compiler uses the lower case format.
· DeinoFMPIs.lib – MPI_INIT@4. All capital external names. Functions use the stdcall calling convention. Visual Fortran 6.x uses this format.
· DeinoFMPIg.lib – mpi_init__. All lower case external names with two trailing underscores. Functions use the C calling convention. g77 uses this format.
For examples using specific compilers see the companion DeinoMPI compilers document.
Running Applications
You can use the graphical DeinoMPIwin.exe or mpiexec.exe from the command line to start MPI jobs.
DeinoMPIWin.exe
This multi-purpose tool can be used to start MPI jobs, manage the user’s Credential Store, search the local network for machines with DeinoMPI installed, verify the mpiexec inputs to diagnose common job problems, and view the DeinoMPI web page for information such as help pages on all the MPI functions.
Mpiexec tab
The main page is used to start and interact with MPI jobs.
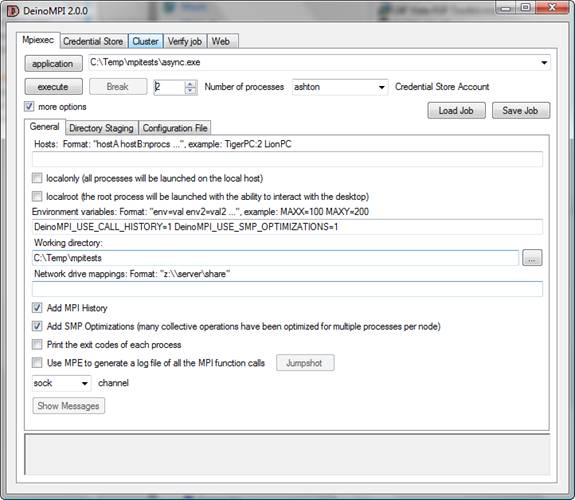
The mpiexec tab contains the following sections:
- Application button and text box
- Enter the full path to your MPI application here. The path must be valid on all machines in the job. If you specify a local path like, C:\temp\myapp.exe, then you must copy myapp.exe to all the nodes in the job before executing the job. DeinoMPI does not push local files out to the nodes for you unless you use the directory staging options.
- If you enter a network path to an executable you need to make sure you have enough licenses on the server to host the executable. For example if the application is specified like this, \\myserver\myshare\myapp.exe, then you need to make sure that the host myserver has enough licenses to serve myapp.exe to all the nodes in the cluster. Windows XP only allows 10 network connections to a file. If you plan on running jobs this way with more than 5 processes then you probably need to be running Windows Server on the myserver machine.
- Click the Application button to browse to the location of your executable.
- Execute button
- Click this button to start the job. The output area will turn green while the job is running and output will be displayed there. You can also type into the output area and the characters will be sent to the root process in the job each time you hit enter.
- Break button
- This button can be used to abort a job and kill all the processes.
- Number of processes spinner
- Use this control to enter how many processes you want to launch.
- Credential Store Account selection box
- Select the user credential to launch the job under. If your Credential store does not contain any user credentials then you will be prompted to enter a user account when you click the Execute button.
- More options check box
- This box expands or contracts the extra controls area.
- Hosts edit box
- Enter the hosts here where the job is to be launched. If this is left blank then the default hosts are used. If it is blank and there are no default hosts then the local host is used. Hosts are selected from this list in a round robin fashion from left to right. If you want more than one process to be deposited on a host before moving on to the next host you can specify this by adding a colon and a number to the host name. So if your list looked like this:
- hostA hostB:2 hostC
- Then hosts would be selected like this: hostA hostB hostB hostC hostA hostB hostB hostC hostA …
- Localroot check box
- Check this box to have the root process in the job (process 0) launched directly from the current process bypassing the process manager. This means that the process will run under the same credentials as the current process which may or may not be the one selected from the Credential store. It also means that the process will have access to the console so it can do things like bring up windows and interact with the user.
- Localonly check box
- Check this box to cause all processes to be launched on the local machine. All host information will be ignored and all the processes will be launched locally.
- Environment variables edit box
- Enter a list of environment variables and their values here to be set in the environment of each process in the job before each is launched. The format is var=val var2=val2 …
- If either the variable name or value has spaces in it then they must be quoted like this: “my name”=”John Doe”
- Add call history check button
- This helper button adds or removes the environment variable used to control the MPI call history debugging option. With this environment variable set all MPI function calls are printed to an internal ring buffer while the job is running. Then you can click the Show Messages button and the call history will be printed out for each process. The default is to save 32 calls per process. If you want to reduce this number you can set the variable DeinoMPI_CALL_HISTORY_SIZE=num_entries. You can set this value to a number between 1 and 32.
- Add SMP optimizations check button
- This helper button adds or removes the environment variable used to control the SMP optimizations for the collective operations. With this environment variable set the communication patterns for the collective operations are modified to minimize the network traffic on clusters of SMP machines. When jobs are run with multiple processes per host node the collective operations can be broken into two steps, a node phase and a network phase, thus minimizing the network traffic and speeding up the operations. As of the 1.0.7 release the optimized functions are MPI_Bcast, MPI_Barrier, MPI_Allreduce and MPI_Gather and they only apply to MPI_COMM_WORLD. To turn on all optimizations use the variable DeinoMPI_USE_SMP_OPTIMIZATIONS=1. To turn on individual options use DeinoMPI_SMP_BCAST=1, DeinoMPI_SMP_BARRIER=1, DeinoMPI_SMP_GATHER=1 or DeinoMPI_SMP_ALLREDUCE=1.
- Working directory edit box and browse button
- Enter the path to the working directory to be set before each process is launched. Use the browse button to select a directory using a GUI.
- Network mapped drives edit box
- Drive mappings entered here will be mapped before each process is started and removed after the processes exit. The format is <drive>:<share path>. For multiple mappings separate them with semi-colons. The following example shows two mappings: z:\\myserver\myhome;y:\\myserver\mydata
- Channel selection box
- Select the channel to use for inter-process communication. The default is the sock channel and is valid for all cases.
- Sock – TCP/IP socket channel
- This channel uses TCP/IP sockets to communicate between processes.
- Shm – shared memory channel
- This channel can only be used on a single machine and only scales up to about 8 processes
- Sshm – scalable shared memory channel
- This channel can only be used on a single machine
- Exitcodes check box
- Select this option to print the exit codes of all the processes when the job exits.
- Log check box
- Select this option to use the MPE wrappers to create a log file of the MPI job. When the job completes a clog2 file will be created in the same location as the MPI application and will have the same name as the application with .clog2 appended to the end. Then you can use Jumpshot to view this file. Jumpshot will convert the .clog2 file to a .slog2 file before viewing.
- Jumpshot button
- If you have Java installed on your machine this button will launch the Jumpshot viewer and pass it the name of the .clog2 log file created from the last MPI job.
- Show Messages button
- While a job is running this button is available. When you click it a message is sent to all the processes in the job and they reply with information about the state of their internal MPI message queues. This information is then appended to the output area. You can use this information to see what processes are waiting for MPI messages and a small amount of information about each message. The MPI function call history will also be printed for each process if the environment variable, DeinoMPI_USE_CALL_HISTORY, is set.
- Load Job button
- You can load job information into the dialog from a file previously saved using the Save Job button.
- Save Job button
- You can save all the information entered in the dialog to a file.
- Use config file checkbox and input box
- If you select the “Use config file” checkbox you can specify a standard MPI-2 configuration file to describe the job. When this option is selected all the other members of the dialog are disabled because all the job description comes from the specified configuration file. The format of the file is the same as the command line arguments to mpiexec. When specifying arguments to mpiexec sections are separated by the colon character. These sections are placed on independent lines in the configuration file and colons don’t have special meaning. Blank lines are ignored and lines starting with the # character are considered comments. The following is an example of a simple configuration file that starts five processes:
- #sample job
- –n 1 –host HostA C:\temp\master.exe
- –n 4 C:\temp\worker.exe
- Use Directory staging checkbox and associated input fields.
- If you select the “Use directory staging” check box then you can enter the information necessary so you can stage a directory on all the nodes in your job. Enter the source directory where you want files to be copied from. Select the “Copy sub-directories” check box if you want sub directories under the source directory to be copied also. Enter the destination directory where you want the files copied to on all the nodes. If you leave this field blank then the destination will be the same as the source. You can limit which files will be copied by entering a wildcard specification. For example if you enter *.txt then only files that end in .txt will be copied (the default is all files *.*). The files and directories are copied out to the nodes before the job starts. After the job ends you can copy any modified files back to the source directory if you select the “Copy modified files …” checkbox. When files are copied back to the source they will overwrite files in the source directory. But if there are files created on the nodes with the same names they will be renamed when copied back to the source so they don’t clobber each other.
- For example: If you had a directory on a server with your executable and data files you could enter the directory in the source edit box like this: \\myserver\myshare\myjob1. Then you could enter a local location in the destination directory field like this: c:\temp\job1. Then you could enter into the application field the name of your job executable relative to the local directory like this: c:\temp\job1\myapp.exe. When you click execute to start the job the first thing that happens is the myjob1 directory is copied to all the nodes. Then the job will run and after the job finishes if you selected to copy the modified files then any modified or new files in the c:\temp\job1 directory will be copied back to the source directory, \\myserver\myshare\myjob1.
- The source doesn’t have to be on a server. You could enter a local directory to be copied to all the nodes like: c:\data\cfd\parallel\sim123.
- Output area
- The output area displays output from the currently running job. It turns green while the job is active as a visual queue to indicate that the job is running. You can type into this area and the input will be forwarded to the root process in the job each time the enter key is pressed.
Credential Store tab
The Credential Store tab is used to manage the current user’s Credential Store.
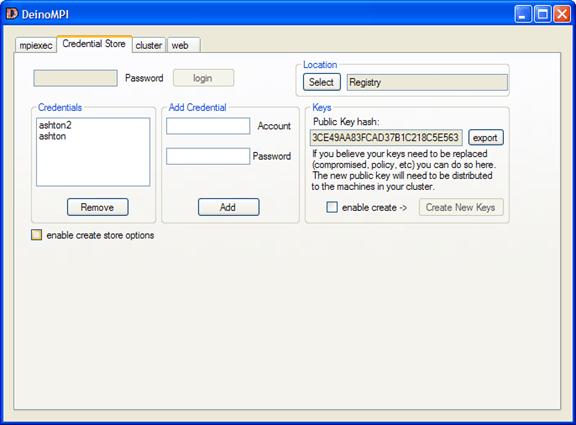
If you do not have a Credential Store created then select the “enable create store options” check box and more options will be available. These options are hidden by the check box because they are usually only needed once by the current user the first time DeinoMPI is run.
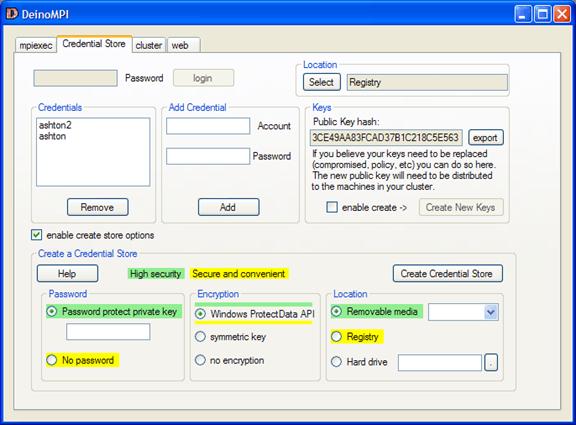
Creating a credential store
Click the “enable create store options” check box to enable the creation fields
Select your choice from the three sections and then click Create Credential Store
The three sections are
- Password
- If you select a password then the Credential store can only be accessed by entering this password. This is the most secure option but it requires that you enter this password every time an MPI job is run. The password is not stored anywhere so you have to enter it for every job.
- Selecting no password protection makes using MPI easier to use but slightly more vulnerable. With no password, any program run by the current user can access the Credential store. This usually isn’t a problem if you know you are not running any malicious software.
- Even with no password your Credential store is still not available to other users if you select encryption.
- Encryption
- Select “Windows ProtectData API” to encrypt your Credential store using the current user’s encryption scheme provided by Windows. This ensures that your Credential store can only be accessed by you when you are logged in.
- If you selected a password for your store then you can select the symmetric key encryption format. This encryption uses the password to create a symmetric key to encrypt the Credential store. This encryption is not user specific so any user who knows the password can access the store.
- The “no encryption” option is not recommended. This option stores the data in the store in plain-text that anyone can access. With this option it is your responsibility to protect the Credential store file.
- Location
- Select the Removable media option to save the store on a removable device like a USB thumb drive. If you select this option then MPI jobs can only be started by the current user when this drive is inserted in the machine. This can be a security enhancement since the user controls window of time when the Credential store is available. If this is combined with a password and the Windows ProtectData API encryption then the device is also quite safe in case it is lost or misplaced.
- You can use the hard drive option to save the store to a specific location on your machine. The browse button lets you graphically navigate to a directory. This option also allows you to navigate to any location including a removable media device.
- Select the Registry option if you want to save the store in the current user’s Windows Registry hive.
Recommendations:
If you want the highest security option it is recommended that you select a password, the Windows ProtectData API and save the store to a removable USB thumb drive. Click the green High Security label to automatically select these settings.
If you want high security and convenience it is recommended that you select no password, the Windows ProtectData API and save the store to the Windows Registry. Click the yellow Secure and Convenient label to automatically select these settings.
Once you have created a Credential store you can use the rest of the fields in the Credential store tab to manage the store. You can add and remove user names and passwords from the store using the Add and Remove buttons.
If your store is password protected then you will need to enter the password into the password box and click login before you will have access to the store.
You can change the location of your Credential store using the location section. This is useful if you have created multiple stores. For example you may want to switch between a store saved to the Windows Registry and another store saved on a USB thumb drive.
The Keys section shows the hash of the public key in your store. You can export the public key to a file by clicking the export button. This file can then be imported into the PublicKey store on other machines in your cluster. This is required if you select the option to deny unknown public keys when connecting to machines in your cluster. The default behavior is to automatically distribute public keys when connecting to machines for the first time. If you disable the automatic option then you will need to import the public key of each user that is allowed to run jobs on a machine. Public keys can be imported into the local PublicKey store on each machine by an administrator using the manage_public_keys.exe command line tool.
You can also change the public and private keys in your store. Since this is an uncommon option it is protected by two clicks. First select the enable create check box to enable the button to create new keys. Then click the Create New Keys button and the keys will be replaced in your store with new ones. This option is provided in case your keys are compromised for some reason. You may also have security requirements that require you to change the keys at certain intervals. How you decide to manage your keys and Credential stores is up to you.
Cluster tab
The cluster tab is used to view the machines on your local network and see what version of DeinoMPI you have installed.
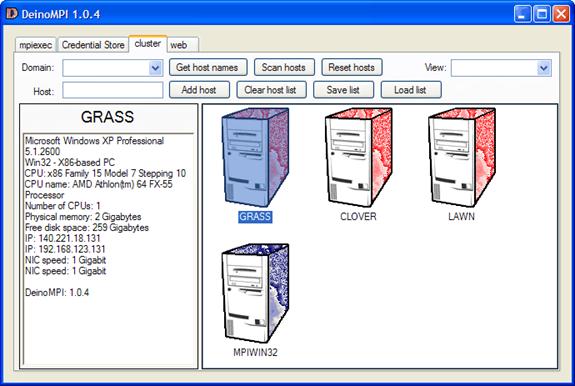
The cluster tab contains the following items:
- Domain dropdown input box. If your network is part of a domain you can input the domain name here and then click the get host names button to retrieve the host names from the domain controller. When you select the drop down arrow the tool queries the network for available domains and adds them to the list. This operation can take a while.
- Get host names button. After entering a domain name in the domain box click this button to query the domain for host names and add them to the host list.
- Scan hosts button. Click this button to query all the hosts in the host list to see if they have DeinoMPI installed. This operation takes a long time and processing goes on in a background thread. Hosts where DeinoMPI is installed turn red or blue. Blue hosts have DeinoMPI installed but it is a different version from the one installed on the local machine. The version installed must be the same on all the nodes in order to run jobs so only red machines can participate in jobs. Hosts where DeinoMPI is not installed turn grey. If you add more hosts to the list and then click the scan button again, only the hosts that have not been previously scanned are scanned.
- Reset hosts button. Click this button to reset all the hosts in the list to an un-scanned state. After clicking the reset button, if you click the scan button all the hosts will be scanned.
- Host input text box. Use this box to enter host names.
- Add host button. After entering a host name into the host input text box click this button to add the host name to the list.
- Clear host list button. The clear button removes all hosts from the host list.
- Save list button. Click this button to save all the hosts in the list to a file. Any scanned information is also stored in the file.
- Load list button. Click this button to load a host list from a file that was previously created using the save list button. This is useful for large lists of hosts since the scan operation is quite time consuming and hosts usually don’t change their configuration often.
- View dropdown selection box. Use this option box to determine how the hosts are presented in the host list area. The two options are Large icons and Details. The large icons option shows icons and host names. The details option shows the hosts in a list with small icons and columns for each piece of host information. Clicking the column headers will sort the list based on the selected column.
- Hosts list. The host list area shows all the hosts and any scanned information about the hosts in various views. Red hosts have DeinoMPI installed on them. Blue hosts have a version of DeinoMPI installed on them that does not match the version installed on the local host. Grey hosts do not have DeinoMPI installed and white hosts have not been scanned yet. When you click an individual host it will be scanned and the resulting information will be presented in the host info area. While a host is being scanned a question mark appears on the machine icon. If you select one or more hosts then a context menu becomes available using the right mouse button. Right click the selected hosts and you can perform any of the following actions:
- Send the selected host names to the mpiexec tab. This action puts the selected hosts in the hosts text box of the mpiexec tab. Then when you launch a job these hosts will be used to host the processes.
- Scan the selected hosts. This option will scan all the selected hosts. If the hosts have already been scanned they will be reset and scanned again.
- Remove the selected hosts. This option will remove all the selected hosts from the host list.
- Reset the selected hosts. This option will remove any scanned information and return the selected hosts to a pre-scan unknown state.
- Host info area. When an individual host is selected the information about that host is presented in the host info area. If the host has DeinoMPI installed on it then there will be a list of resources available on the host presented here. If the version of DeinoMPI installed on the host does not match the version installed locally the tool will not be able to retrieve any information about the host other than the DeinoMPI version string. If DeinoMPI is not installed on the host then only the host name will be displayed and a message indicating that DeinoMPI is not installed.

Verify Job tab
The Verify Job tab is a diagnostic tool to check to make sure the information provided in the Mpiexec tab describes a valid job that will run on your cluster. It does not run the job but it parses all the information, contacts the hosts and verifies that the job will be able to run. It can find the following problems with a job:
- Missing executables.
- Bad user name or password.
- Missing dynamic link libraries.
- Invalid host names.
- Hosts where DeinoMPI is not installed or the versions don’t match.
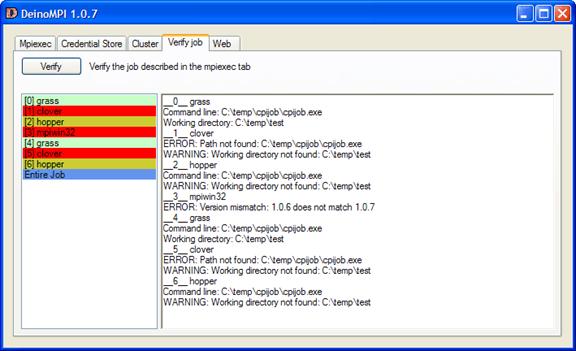
When you click the Verify button the information in the Mpiexec tab is parsed as if the job were to be run and then the hosts are contacted and information is collected. The results for each process in the job are provided in a list with the last entry used to display all the information for all processes. The processes are color coded to quickly ascertain the results. Green processes will run without any problems. Red processes will not run due to one of the problems mentioned in the above bulleted list. Yellow processes will probably run but have warnings. For example if a working directory does not exist on a host a warning will be displayed but the process will still run. If a delay loaded dll dependency is detected in the executable and that dll is not found on a host then a warning is displayed because the process may fail at runtime. This is a warning and not an error because many applications have libraries that load dlls based on the capabilities of the system they run on and do not fail when a dll is missing.
There are some problems that can cause a job to fail when run that the Verify Job tab is not able to check. If the process explicitly loads a dll by name using the LoadLibrary function call and this dll does not exist this error will not be detected. If the application tries to open a file that does not exist on a host this error will not be detected. If there is a fault in the application that causes it to crash or if the architecture doesn’t match these errors will not be detected. There may be other run-time errors that can occur that this tool does not detect. It is provided as a tool to diagnose the most common errors that can be detected without running the job.
If the “Use directory staging” check box from the Mpiexec tab is selected a warning is displayed under the Verify button. If directory staging is selected then there may be files required by the job that will be copied out to the nodes before the job starts. The verify command does not copy any files so it may display errors even though the job may run just fine after the directories are copied to the nodes.
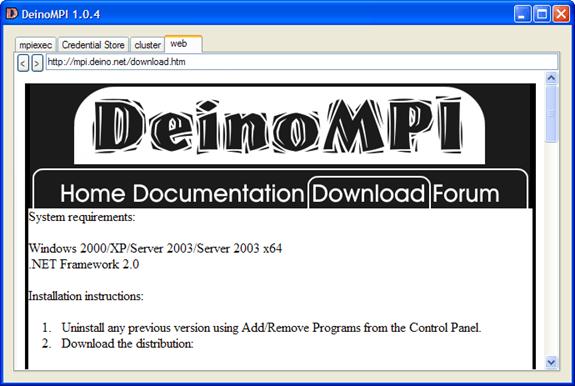
Web tab
The last tab is the web tab and it shows the web page for DeinoMPI. You must be connected to the internet to view this tab.
Mpiexe.exe
This command line tool can be used to start MPI jobs.
Usage
mpiexec -n <maxprocs> [options] executable [args ...]
mpiexec [options] executable [args ...] : [options] exe [args] : ...
mpiexec -configfile <configfile>
Examples
mpiexec -n 4 cpi
mpiexec -n 1 -host foo master : -n 8 worker
Standard options
-n <maxprocs>
-wdir <working directory>
-configfile <filename> -
each line contains a complete set of mpiexec options including the executable and arguments
-host <hostname>
-path <search path for executable, ; separated>
All options
-n x
-np x
Launch x processes.
-localonly x
-n x -localonly
Launch x processes on the local machine.
-machinefile filename
Use a file to list the names of machines to launch on. Each line in the file should contain one host name. Lines beginning with # are ignored. If you want multiple processes to be deposited on a single host you can add a colon and a number to the host name like this: hostA:4
-host hostname
-hosts n host1 host2 ... hostn
-hosts n host1 m1 host2 m2 ... hostn mn
Launch on the specified hosts.
In the second version the number of processes = m1 + m2 + ... + mn.
Example: mpiexec –hosts 3 hostA hostB 2 hostC myapp.exe
The example would produce 4 processes, 1 on hostA, 2 on hostB and 1 on hostC.
-map drive:\\host\share
Map a drive on all the nodes. This mapping will be removed when the processes exit. Example: mpiexec –map z:\\myserver\myhome –n 4 z:\myapp.exe
-dir drive:\my\working\directory
-wdir drive:\my\working\directory
Launch processes in the specified directory. –wdir and –dir are synonyms.
Example: mpiexec –dir c:\temp –n 4 myapp.exe
-env var val
Set environment variable before launching the processes.
Example: mpiexec –env VERBOSE 1 –n 4 myapp.exe
-logon
Prompt for user account and password.
-pwdfile filename
Read the account and password from the file specified. Put the account on the first line and the password on the second.
-user <user name>
Select the username to be used from the Credential store. With this option you can specify different users for different hosts. This is useful if you have different user accounts and passwords for different machines. The user name must match an account saved in the current user’s Credential store. If you have the same user name on different machines but different passwords you will have to specify the machine name in the user account name like this: hostA\userA and hostB\userA.
Example: mpiexec –user joe –host Foo –n 2 myapp.exe : -user john –host Bar –n 3 myapp.exe
-exitcodes
Print the process exit codes when each process exits.
-noprompt
Prevent mpiexec from prompting for user credentials.
-priority class[:level]
Set the process startup priority class and optionally level.
class = 0,1,2,3,4 = idle, below, normal, above, high
level = 0,1,2,3,4,5 = idle, lowest, below, normal, above, highest
The default is -priority 2:3.
-localroot
Launch the root process directly from mpiexec if the host is local. (This allows the root process to create windows and be debugged.)
-path search_path
Search path for executable. Separate paths with the ; character.
Example: mpiexec –path c:\bin;c:\temp –n 4 myapp.exe
-timeout seconds
Specify a timeout for the job in seconds. If the job takes longer than the specified number of seconds mpiexec will kill the processes.
Example: mpiexec –timeout 180 –n 4 myapp.exe
-set_hosts hostA hostB:N hostC ...
Set the default hosts and optionally the number of processes per host. If you want to specify the number of processes to be deposited on a host put a colon at the end of the host name and then put the number, like this: foo.host.com:2. This is useful for multi-CPU machines where you want processes deposited on hosts one per CPU.
-set_myhosts hostA hostB:N hostC …
Set the default hosts for the current user only. Use the same format as the –set_hosts option.
-log
Use the MPE logging library to log the MPI job. A clog2 file is produced after the job finishes which can be converted and viewed using Jumpshot (requires Java to be installed on the host).
-validate
Validate that the job can run without actually starting the job. Add this flag along with all the rest of the mpiexec command line. The hosts are contacted to determine if the job can run but executables are not started.
Example: mpiexec –validate –n 4 cpi.exe
-stage path
Specify the source directory you want to copy out to all the nodes before the job is started.
Example: -stage c:\data\myjob or -stage \\myserver\myshare\data
-stage_dest path
Specify the destination directory where you want the staged directory to be copied to. If this option is not specified then the source directory is used as the destination.
Example: mpiexec -stage \\myserver\myshare\data -stage_dest c:\temp\data ...
-stage_recursive
Specify this flag to indicate that you want the source directory to be copied and all of its sub-directories also.
-stage_wildcards pattern
Specify a wild-card pattern to limit which files are copied out to the worker nodes when staging a directory. Only files that match this pattern will be copied.
Example: mpiexec -stage_wildcards *.txt -stage c:\temp\data …
-stage_nopull
Specify this flag to indicate that you do not want any modified files copied back to the source directory after the job has finished. The default behavior is for new or modified files in the staging destination directory to be copied back to the source directory after the job has completed. This flag overrides that option.
-version [hostname]
Print the version of DeinoMPI installed on the specified machine. If no host is specified then print the version installed on the local machine.
Debugging Applications
Debugging parallel applications is hard but there are a few options provided by DeinoMPI that can help.
1) This simplest and sometimes most effective way to debug MPI applications is to add printf statements to your code. Whenever you add a printf statement, make sure to add a call to fflush(stdout); after the printf statement or statements. It is important to do so because the output of applications is buffered by default and must be flushed if you want to see the output immediately. This is true for stderr also because unlike on UNIX systems stderr is buffered on Windows machines.
2) The DeinoMPIwin.exe GUI tool has a Show Messages button that can provide useful information.
First, the Show Messages button will display the current state of the internal MPI message queues. This can be useful if your application hangs and you are not sure why. You can click the Show Messages button and see what messages are in the internal message queues for each process. Two message types can show up. There can be posted messages where a process is expecting a message but has not received it yet. And there can be messages that have been received and buffered but not matched yet. Note: some messages may not correspond directly to user code MPI calls since the implementation uses internal messages to implement the collective, file and win MPI functions. But it is easy to understand these messages because they are marked with type information.
Second, the Show Messages button will display the MPI function call history for each process if you have specified the DeinoMPI_USE_CALL_HISTORY environment variable. With this option turned on each MPI function call is logged to an internal ring buffer. When you click the Show Messages button the last N calls will be printed out for each process. The default is to save 32 calls per process but this can be reduced using the environment variable, DeinoMPI_CALL_HISTORY_SIZE. Set this value to a number between 1 and 32 to limit the depth of MPI calls per process saved.
3) Jumpshot is a java tool that can be used to profile applications. It is limited in its debugging ability though because applications must run to completion in order to generate log files. The primary goal of Jumpshot is to view the runtime patterns of an MPI application and then analyze these patterns to see if changes can be made to the code to optimize the application. Jumpshot has very well developed tool options for this kind of work. See the Jumpshot manual for information.
Using a debugger
There are at least two ways you can use a debugger to step through your parallel processes. These methods have been tested using the Visual Studio debugger but may also work with other debuggers.
1) Use a debugger to attach to the running processes. If your application has a natural wait state then you can simply attach the debugger when the processes are idle. Otherwise you can add code to the beginning of your application to cause it to wait. For example: you could create a local variable, set it to true and add a while (local_variable) { Sleep(100); } statement. When you start the application using mpiexec.exe all the processes will be stuck in this infinite loop. Use the debugger to attach to the processes and set the local_variable value to false. Then you will be able to step through the process. You could also make this Sleep block depend on a command line parameter so that you can attach to a specific process instead of all of the processes. Depending on the user privileges you may get Access Denied errors when trying to attach to processes started by mpiexec.exe because the processes are started by the DeinoPM service. If this is the case you can use the –localonly flag to start the processes: “mpiexec.exe -localonly …”. This will start the processes directly from the current user’s environment.
2) A second method is to start each process by hand. You will set up the environment for each process and start the debugger for each process. In order to debug processes directly without attaching to running processes you will need to set up the environment variables for each process. You can set the environment variables, start the debugger and then step through the process. When you start a job this way the dynamic process functions like MPI_Comm_spawn will not be available. The smallest set of variables required to be set are: PMI_ROOT_HOST, PMI_ROOT_PORT, PMI_ROOT_LOCAL, PMI_RANK, PMI_SIZE, PMI_KVS, PMI_WDLL_NAME. Here is a batch file that can be run to set the variables for each process:
· if "%1" == "" goto HELP
· if "%2" == "" goto HELP
· set PMI_ROOT_HOST=%COMPUTERNAME%
· set PMI_ROOT_PORT=9222
· set PMI_ROOT_LOCAL=1
· set PMI_RANK=%1
· set PMI_SIZE=%2
· set PMI_KVS=deinompi
· set PMI_WDLL_NAME=none
· goto DONE
· :HELP
· REM usage: setmpi2 rank size
· :DONE
Save this text as setmpi2.bat and then use it as follows. Bring up a command prompt for each process in the job. Let’s assume you are starting a two process job. Bring up two command prompts and execute the following in the first one: “setmpi2.bat 0 2”. Then execute this in the second one: “setmpi2.bat 1 2”. The first prompt will be rank 0 in a job of size 2. The second prompt will be rank 1 of size 2. Then from the each command prompt execute: “devenv.exe myapp.exe”. Substitute the name of your application for myapp.exe. Devenv.exe is probably located at C:\Program Files\Microsoft Visual Studio 8\Common7\IDE\devenv.exe. At this point you will have two debuggers open. Now you can step through each process independently using the two debugger windows. There is one requirement to stepping through the processes. You must step over MPI_Init in the root process, process 0, first before calling MPI_Init from the other processes. Also you can restart the processes from within the debuggers but you have to restart all of them and make sure process 0 calls MPI_Init first.
The setmpi2.bat script assumes that the job will run on a single host. If you want to run on multiple machines you will need to change the PMI_ROOT_HOST environment variable to be the name of the host where process 0 is started. For example: on the second host you could execute “setmpi2.bat 1 2” and then “set PMI_ROOT_HOST=first_host_name”.
Command line tools
The following command line tools are provided to support DeinoMPI. create_credential_store.exe and manage_credentials.exe provide command line options equivalent to those found in the GUI DeinoMPIwin.exe tool. manage_public_keys.exe is an administrative tool that provides additional functionality not replicated in the GUI tool.
create_credential_store.exe
This tool creates a Credential store for the current user. It can be run in interactive mode, with a response file, or use defaults.
Run create_credential_store.exe with no parameters and it will prompt you for the information necessary to create a store.
- First it displays an introductory message and asks if you want to create a Credential store. If you specify yes it continues otherwise it exits.
- Then it prompts for a password to protect the private key in the Credential store. If you do not enter anything by simply hitting enter it prompts you to confirm that you do not want the key to be password protected.
- Then it prompts you for the type of encryption to protect the keys with. If you select “none” the keys will not be encrypted. If you select “protect” it will use the Windows API protect data functions to encrypt the keys. This type of encryption is user specific and can only be decrypted by the current user. Stores protected this way cannot be used by other users even if they know the password protecting the store. If you entered a password in step 2 then a third option is available: symmetric encryption. This option uses the password to create a symmetric key to encrypt the store. This type of encryption can be decrypted by any user who knows the password.
- Then it prompts for the location to save the Credential store. The options are to save it in the Windows registry for the current user, on a removable device like a USB drive, or on the hard drive.
- Then the Credential store is created and afterwards the user is ready to use manage_credentials.exe to add user credentials to the store and mpiexec to start MPI jobs.
Run create_credential_store.exe with a filename as the first parameter and it will use the data in the specified file to create a credential store. The response file has three lines in it.
1) The first line is the password. Leave this line blank if you don’t want the store password protected.
2) The second line specifies which type of encryption to use. Specify ‘protect’, ‘symmetric’, or ‘none’.
3) The third line contains the path to the location where you want the store saved or the keyword ‘registry’ to save it in the current user’s registry hive.
Example response file:
foobar
protect
C:\me\mydata
Run create_credential_store.exe –default to create a credential store with the default settings. The defaults are no password, protect, and registry.
manage_credentials.exe
This tool manages user credentials stored in the current user’s Credential store. Run it with no parameters and it will output a usage message briefly explaining the options.
- manage_credentials /add [username] [password]
- Add a credential to the store.
- If you do not enter a username and or password you will be prompted to enter these parameters. If a credential with the same username already exists in the store it will be replaced.
- manage_credentials /remove [username]
- Remove the credential from the store.
- manage_credentials /list
- List all the usernames in the store.
- manage_credentials /replace_keys
- Create a new private and public key and re-encrypt all the existing credentials in the store.
- manage_credentials /set_location [path or "registry"]
- Point the current user to the Credential store specified.
- Provide either the full path to the Credential store file or registry to refer to the Windows Registry.
manage_public_keys.exe
This tool manages the Credential store public keys for the current user and the current machine. Some options to this tool require administrator privileges to execute. Run it with no parameters and it will output a usage message briefly explaining the options.
User level options:
- manage_public_keys /export <filename>
- Export the public key from the current user's Credential Store and save it to the specified file.
- manage_public_keys /export <filename> <CredentialStore filename>
- Export the public key from the specified Credential Store and save it to the specified file.
Administrator level options:
- manage_public_keys /import <filename>
- Import the public key from the specified file and save it in the PublicKey store for the local machine.
- manage_public_keys /list
- List the public keys in the PublicKey store for the local machine.
- manage_public_keys /remove <public key hash>
- Remove the public key in the PublicKey store for the local machine that corresponds to the specified key hash
- manage_public_keys /clear_all
- Remove all public keys in the PublicKey store for the local machine
- manage_public_keys /auto_keys <true or false>
- Set the policy on the local machine to either accept new public keys from incoming connections automatically or reject them. If auto_keys is set to false then all user keys must be individually imported into the PublicKey store using the /import option.
Support
Send bug reports and other correspondence to support@deino.net